투명한 기부를 하고싶다면 이 링크로 와보세요! 🥰 (클릭!)
바이낸스(₿) 수수료 평생 20% 할인받는 링크로 가입하기! 🔥 (클릭!)
뭐, 이 글은 완벽한 번역은 아니고, 읽다가 별 내용 아닌거 빼고 그냥 중요한 내용 위주로 번역(정리) 해 놓은 글입니다.
이 글 + 원본 문서를 같이 읽으시는걸 추천드립니다 :)
https://doc.akka.io/docs/akka/current/typed/guide/introduction.html
Introduction to Akka
아카는 안정적인 동작, 고장 방지 능력(fault tolerance), 고성능을 제공하기 위한 코드를 작성함에 있어 low-level 코드를 작성하지 않고, 비즈니스 요구를 충족시키기 위해 집중할 수 있게 해 준다. 분산 시스템은 component가 응답하지않고 죽거나, 추적되지 않는 상황에서 메시지가 유실되거나, latency가 변동되는 환경 안에서 잘 대처해야 한다.
이를 처리하기 위해서 아카는 다음을 제공한다.
- Multi-threaded behavior without the use of low-level concurrency constructs like atomics or locks — relieving you from even thinking about memory visibility issues. / 멀티쓰레드 환경에서 atomics나 locks등등을 사용하지 않고도 메모리 가시성 문제 등등에서 잘 대응 해줌
- Transparent remote communication between systems and their components — relieving you from writing and maintaining difficult networking code. / 시스템과 구성 요소 간의 투명한 통신으로 인해 어려운 네트워킹 코드를 작성 및 유지관리가 필요 없음.
- A clustered, high-availability architecture that is elastic, scales in or out, on demand — enabling you to deliver a truly reactive system./ 필요에 따라 확장되고 축소되는 탄력적 클러스터 아키텍쳐로 반응형 시스템 제공 가능.
중간에 Quickstart 하고 오라고 해서
https://developer.lightbend.com/guides/akka-quickstart-scala/index.html
Akka Quickstart with Scala
Akka Quickstart with Scala Akka is a toolkit and runtime for building highly concurrent, distributed, and fault-tolerant event-driven applications on the JVM. Akka can be used with both Java and Scala. This guide introduces Akka by describing the Scala ver
developer.lightbend.com
What Hello World does
본 예시는 3개의 actor을 가지고 있다.
- Greet: Receives commands to Greet someone and responds with a Greeted to confirm the greeting has taken place
- GreeterBot: receives the reply from the Greeter and sends a number of additional greeting messages and collect the replies until a given max number of messages have been reached.
- GreeterMain: The guardian actor that bootstraps everything
들어가기에 앞서, 이전의 AKKA가 아닌 typed AKKA에 대한 튜토리얼이므로 이전 아카를 어느정도 알고있었다면
https://taeguk2.blogspot.com/2019/09/akka-typed_18.html
Defining Actors and messages
각각의 Actor은 수신할 수 있는 메시지를 위한 type T를 정의한다.
이제부터 만들어 볼 Hello World Actor은 3개의 다른 메시지를 사용 할 것이다.
- Greet: greet(반겨주기)을 위해 Greeter 에게 보내지는 명령
- Greeted: Greeter로부터 greet가 일어났다는걸 확인할 수 있게 오는 응답.
- SayHello: GreeterMain에게 greet하기 시작하라고 하는 명령
4가지 명심할 점이 있다.
- 메시지는 Actor의 public API이므로, 데이터 타입의 이름을 rich한 정보를 담고 있게 작성하는 것이 좋다.
- 메시지는 변경 불가능 해야 한다. 여러 쓰레드에서 공유 되기 때문이다.
- 액터와 관련된 메시지는 액터의 오브젝트에 넣는 것이 좋다. 이를 통해 액터가 기대하고 처리하는 메시지 유형을보다 쉽게 이해할 수 있다.
- 액터의 초기 행동(behavior)을 오브젝트의 apply method에 포함시키는 것이 좋다.
The Greeter actor
object Greeter {
  final case class Greet(whom: String, replyTo: ActorRef[Greeted])
  final case class Greeted(whom: String, from: ActorRef[Greet])

  def apply(): Behavior[Greet] = Behaviors.receive { (context, message) =>
    context.log.info("Hello {}!", message.whom)
    message.replyTo ! Greeted(message.whom, context.self)
    Behaviors.same
  }
}
메시지 타입은 두개를 정의 해 놓았다. 첫번째로 Greet하는 메시지 타입, 그리고 Greet하는 것이 끝났음을 확인하는 메시지 타입이 그것이다. Greet 는 ActorRef를 가지고 있는데, 그 이유는 Greeter Actor에게 확인 메시지를 돌려줄 위치를 알려주기 위해서이다.
Actor의 행동(behavior)은 behavior facory 인 Behaviors.receive 를 통해서 Greeter으로 정의가 된다. 다음 메시지를 처리하고 새로운 behavor을 반환한다. State는 변하지 않는 State를 가지는 새로운 behavior을 반환하면서 업데이트 된다. 이 예시에서는 State를 바꿀 필요가 없기에, Behavior.same을 리턴한다. 다음에 할 행동(behavior) 또한 "이전과 같다" 라는 의미이다.
behavoir에 메시지 타입이 Greet으로 정의(Behavior[Greet])되어 있으므로, message argument는 똑같은 타입이 된다. 따라서 whom이나 replyTo 멤버 변수를 패턴매치 등을 사용하지 않고도 쓸 수 있는 이유이다. 일반적으로, 엑터는 둘 이상의 메시지 타입을 처리하며, 따라서 액터가 extends를 처리할 수 있는 모든 메시지에 대한 하나의 공통된 trait가 존재한다.
또, ! 를 통해서 (tell 이나 bang이라고 읽음) Greeter Actor가 또다른 Actor에게 메시지를 보내는 것을 볼 수 있다.
The Greeter bot actor
object GreeterBot {

  def apply(max: Int): Behavior[Greeter.Greeted] = {
    bot(0, max)
  }

  private def bot(greetingCounter: Int, max: Int): Behavior[Greeter.Greeted] =
    Behaviors.receive { (context, message) =>
      val n = greetingCounter + 1
      context.log.info("Greeting {} for {}", n, message.whom)
      if (n == max) {
        Behaviors.stopped
      } else {
        message.from ! Greeter.Greet(message.whom, context.self)
        bot(n, max)
      }
    }
}
이 액터가 behavoir를 바꿔가면서 어떤 새로운 변수도 사용하지 않고 Greeted를 답장한 카운터를 관리한다.
->? Behavior가 바뀌나?
The Greeter main actor
세 번째 actor은 Greeter와 GreeterBot을 spawn하며 interaction을 시작, actor을 만들어내며 spawn이 무엇을 하는지는 아래에서 알아본다.
object GreeterMain {

  final case class SayHello(name: String)

  def apply(): Behavior[SayHello] =
    Behaviors.setup { context =>
      val greeter = context.spawn(Greeter(), "greeter")

      Behaviors.receiveMessage { message =>
        val replyTo = context.spawn(GreeterBot(max = 3), message.name)
        greeter ! Greeter.Greet(message.name, replyTo)
        Behaviors.same
      }
    }
}
Creating the Actors
좀더 알아보자. (중간에 프로그램 흐름이 이해가 안간다면 더 아래의 full code가 있으니 보고 와도 좋을 것 같다)
The power of location transparency
아카에서는 new 키워드를 통해서 instance를 만들 수 없다. 대신, spawn 팩토리 메소드를 사용하여 Actor을 만든다. Spawn은 Actor instance를 리턴하지 않고, 해당 Actor을 가리키는 akka.actor.typed.ActorRef 를 리턴한다. 이 간접 참조가 많은 분산시스템 상에서의 유연성을 준다.
The Akka ActorSystem
ActorSystem은 Akka의 처음 진입 포인트인데, application당 하나만 만들어진다. 그 ActorSystem은 guardian actor이라는 이름이 있다.
Hello World 가디언 액터는 GreeterMain이다.
val greeterMain: ActorSystem[GreeterMain.SayHello] = ActorSystem(GreeterMain(), "AkkaQuickStart")GreeterMain은 application을 부트스트래핑 하기 위해 Behaviors.setup을 사용한다.
object GreeterMain {

  final case class SayHello(name: String)

  def apply(): Behavior[SayHello] =
    Behaviors.setup { context =>
      val greeter = context.spawn(Greeter(), "greeter")

      Behaviors.receiveMessage { message =>
        val replyTo = context.spawn(GreeterBot(max = 3), message.name)
        greeter ! Greeter.Greet(message.name, replyTo)
        Behaviors.same
      }
    }
}
Spawning child actors
다른 actor은 ActorContext에서 spawn을 사용해서 만들 수 있다. GreeterMain은 SayHello 메시지를 받을 때 마다 새로운 GreeterBot을 시작하며, Greeter 액터 또한 같은 방법으로 시작한다.
val greeter = context.spawn(Greeter(), "greeter")
  val replyTo = context.spawn(GreeterBot(max = 3), message.name)
Asynchronous communication
액터는 반응형이며 message driven 하다.
액터는 아무 일을 하지 않을 때는 어떤 리소스도 사용하지 않고 suspended state에 머물러 있는다. 그리고 메시지를 Mailbox에 받으면 그때 일을 시작한다.
Sending messages to an Actor
Actor의 Mailbox에 메시지를 넣기 위해서는 ! 메소드를 ActorRef에 쓰면 된다. 예를 들어, HelloWorld의 메인 클래스는 GreeterMain Actor에 다음과 같은 메시지를 보낸다.
greeterMain ! SayHello("Charles")Greeter 액터도 greeting이 끝나면 메시지를 보낸다.
message.replyTo ! Greeted(message.whom, context.self)The Main class
Hello World안의 AkkaQuickstart 오브젝트는 가디언으로써 ActorSystem을 생성한다. 어플리케이션을 bootstrap한다. 가디언은 보통 초기의 bootstrap을 포함하는 Behaviors.setup으로 정의된다.
object AkkaQuickstart extends App {
  val greeterMain: ActorSystem[GreeterMain.SayHello] = ActorSystem(GreeterMain(), "AkkaQuickStart")

  greeterMain ! SayHello("Charles")
}
Full example code
총 예시 코드이다.
//#full-example
package $package$


import akka.actor.typed.ActorRef
import akka.actor.typed.ActorSystem
import akka.actor.typed.Behavior
import akka.actor.typed.scaladsl.Behaviors
import $package$.GreeterMain.SayHello

//#greeter-actor
object Greeter {
  final case class Greet(whom: String, replyTo: ActorRef[Greeted])
  final case class Greeted(whom: String, from: ActorRef[Greet])

  def apply(): Behavior[Greet] = Behaviors.receive { (context, message) =>
    context.log.info("Hello {}!", message.whom)
    //#greeter-send-messages
    message.replyTo ! Greeted(message.whom, context.self)
    //#greeter-send-messages
    Behaviors.same
  }
}
//#greeter-actor

//#greeter-bot
object GreeterBot {

  def apply(max: Int): Behavior[Greeter.Greeted] = {
    bot(0, max)
  }

  private def bot(greetingCounter: Int, max: Int): Behavior[Greeter.Greeted] =
    Behaviors.receive { (context, message) =>
      val n = greetingCounter + 1
      context.log.info("Greeting {} for {}", n, message.whom)
      if (n == max) {
        Behaviors.stopped
      } else {
        message.from ! Greeter.Greet(message.whom, context.self)
        bot(n, max)
      }
    }
}
//#greeter-bot

//#greeter-main
object GreeterMain {

  final case class SayHello(name: String)

  def apply(): Behavior[SayHello] =
    Behaviors.setup { context =>
      //#create-actors
      val greeter = context.spawn(Greeter(), "greeter")
      //#create-actors

      Behaviors.receiveMessage { message =>
        //#create-actors
        val replyTo = context.spawn(GreeterBot(max = 3), message.name)
        //#create-actors
        greeter ! Greeter.Greet(message.name, replyTo)
        Behaviors.same
      }
    }
}
//#greeter-main

//#main-class
object AkkaQuickstart extends App {
  //#actor-system
  val greeterMain: ActorSystem[GreeterMain.SayHello] = ActorSystem(GreeterMain(), "AkkaQuickStart")
  //#actor-system

  //#main-send-messages
  greeterMain ! SayHello("Charles")
  //#main-send-messages
}
//#main-class
//#full-example
흐름대로 따라가보자면, greeterMain에 시작하는 명령을 보내고 -> GreeterMain이 메시지를 받으면 replyTo를 spawn해서 삭 삭 순차적으로 실행되는 것을 볼 수 있다.
Testing Actors
HelloWorld 예제의 테스트는 ScalaTest 프레임워크의 예시를 보여준다. 전부 테스트 하지는 않고, 얼마나 간단한지, 그리고 기본적인 컨셉 등을 보여주기 위함이다.
Test class definition
class AkkaQuickstartSpec extends ScalaTestWithActorTestKit with WordSpecLike {스칼라 테스트에 대한 지원은 ScalaTestWithActorTestKit를 extend하면 된다. 다른 테스트 프레임워크들은 다큐먼트를 참고.
우리가 테스트에 사용할 테스트를 사용하면 ActorTestKit의 라이프 사이클의 관리가 가능하다.
Test methods
이 테스트는 TestProbe를 해당 behavior의 정보를 확인하고 검증하기 위해 사용한다.
"reply to greeted" in {
  val replyProbe = createTestProbe[Greeted]()
  val underTest = spawn(Greeter())
  underTest ! Greet("Santa", replyProbe.ref)
  replyProbe.expectMessage(Greeted("Santa", underTest.ref))
}
TestProbe에 대한 reference(참조주소?)를 얻으면, 우리는 Greet 메시지 안에 넣어서 Greeter에게 전달한다. 그리고 나면 greeting이 제대로 Greeter로부터 실행 되었는지 알 수 있다.
Full test code
package $package$

import akka.actor.testkit.typed.scaladsl.ScalaTestWithActorTestKit
import $package$.Greeter.Greet
import $package$.Greeter.Greeted
import org.scalatest.WordSpecLike

class AkkaQuickstartSpec extends ScalaTestWithActorTestKit with WordSpecLike {

  "A Greeter" must {
    "reply to greeted" in {
      val replyProbe = createTestProbe[Greeted]()
      val underTest = spawn(Greeter())
      underTest ! Greet("Santa", replyProbe.ref)
      replyProbe.expectMessage(Greeted("Santa", underTest.ref))
    }
  }

}
코드의 전부는 위와 같다.
이 코드는 ActorTestKit의 일부만을 살펴 본 것에 불과하다.
Running the application
이제 어떻게 sbt를 사용해서 실행하는지 알아보자.
The build files
build.sbt 파일을 통해서 프로젝트를 관리하자.
name := "akka-quickstart-scala"

version := "1.0"

scalaVersion := "2.13.1"

lazy val akkaVersion = "$akka_version$"

libraryDependencies ++= Seq(
  "com.typesafe.akka" %% "akka-actor-typed" % akkaVersion,
  "ch.qos.logback" % "logback-classic" % "1.2.3",
  "com.typesafe.akka" %% "akka-actor-testkit-typed" % akkaVersion % Test,
  "org.scalatest" %% "scalatest" % "3.1.0" % Test
)
또한 project/build.properties 에 어떤 sbt를 사용할지도 명시해야 한다.
sbt.version=1.3.6Running the project
이제 콘솔에서 실행 가능하다.
귀찮은 관계로 이 이후의 번역은 생략했다.
다시 돌아와서,
https://doc.akka.io/docs/akka/current/typed/guide/actors-motivation.html
여기 링크를 보겠다.
OOP의 코어 기둥중에 하나는 encapsulation 이다. 뭐 그렇기 때문에 이런 저런 이유로 멀티쓰레드 환경에서 OOP를 동작시키기가 별로 좋지 않아서 새로운 패러다임이 나와야 한다는 이야기.

여러 쓰레드를 공유하다 보면 쓰레드 B에서 뭐가 실패했는지 쓰레드 A에서는 모르는 상황이 발생할 수 있다. 이런 환경에서 문제가 발생할 수 있게 된다.
뭐 여튼
다음부터가 중요한 얘기니까 거기서부터 본다.
https://doc.akka.io/docs/akka/current/typed/guide/actors-intro.html
How the Actor Model Meets the Needs of Modern, Distributed Systems
현대적인 시스템에 이 친구들을 적용하기 위해서 모든것을 망칠 필요는 없다. 대신, actor model은 이 단점을 다른 방법으로 해결한다. 액터 모델의 추상화는 거대한 조직 안에서 발생하는 교환같은 것이 아닌 communication의 관점에서 코드를 바라보게 해 준다.
Actor을 사용하면
- lock에 의존하지 않고도 encapsulation을 강제하게 된다.
- signal에 반응하고, state를 변경하고, signal을 보내서 모든 어플리케이션을 운영하는 협업하는 엔티티 모델을 사용할 수 있다.
- 우리의 세계에 대한 시야(우리가 바라보는 세계)와 맞지 않는(어울리지 않는) 실행 메카니즘에 대해 걱정할 필요가 없다.
Usage of message passing avoids locking and blocking
메시지 패싱을 통해서 명령을 실행하면, 어떤 하나의 쓰레드를 점유하여 실행되지 않는다. 액터는 blocking없이 메시지를 실행할 수 있다. 따라서 같은 시간에 더 많은 양을 처리할 수 있다.
object를 통해서, 만약에 메소드가 끝나면 쓰레드의 점유를 풀어버린다. 이 점에서, Actor은 object같이 행동하는데, 그들은 메시지에 반응하고 현재 메시지 처리가 끝나면 프로세싱을 종료한다.

위에 쓰레드 공유 머시기에서 살펴 본 것처럼, 만약에 같은 쓰레드에서 return value를 기대하는 상황이라면 block을 하거나 해야겠지만, 대신 result를 reply하는 방식을 택하게 된다.
각 액터는 아무리 많은 state와 invariants가 있다고 해도 독립적으로 하나의 메시지를 한번에 하나씩 처리한다. 그렇기에, 동기화 없이도 모든것이 가능하다.
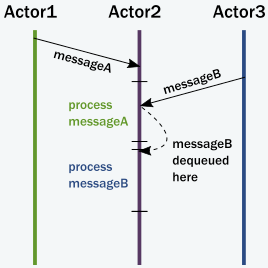
위 그림을 보면 어떻게 처리를 하는지 잘 나와있다.
요약하자면,
1. 액터가 메시지를 quque에 넣는다.
2. 액터가 실행중이 아니면 실행 가능 상태로 표시되어 있다.
3. (숨겨진) 스케쥴러 엔티티가 액터를 실행시킨다.
4. 액터는 queue 맨 앞에서 메시지를 뽑는다.
5. 액터는 내부 state를 바꾸며, 메시지를 다른 actor에 보낸다.
6. 액터는 스케쥴이 없다.
*질문 : 그러면 특정 A라는 행동을 하는 액터는 하나만 만들면 A에 요청이 무수히 많아도 싱글 스레드로만 작업을 처리하나? bottle neck 발생하지 않을가..? -> 설계적으로 그렇지 않게 만들어야 한다.
암튼, 위의 과정을 이루기 위해서 액터는 다음을 가져야 한다.
- mail box
- behavior(actor의 state, 내부 변수 등등...)
- Messages (신호를 표현하는 데이터들이나 등등의 것들)
- Execution environment (실행 환경, 즉 메시지 핸들링 코드와 메시지들을 가지고 있는 액터를 가진 환경)
- address
메시지는 액터 메일박스들에 들어간다. 실행 환경은 이 모든 액터들과 쓰레드 풀을 투명하게 잘 관리한다.
아래와 같은 것들이 해결된다.
*decoupling : 감결합. 결합 관계를 감소시킴.
- encapsulation이 signal을 통한 execution로 인한 decoupling 덕분에 더 잘 보존된다.
- lock이 필요가 없다. race condition이 발생 X
- lock이 없으므로 sender또한 block 되지 않는다. 그래서 몇백만개의 액터가 몇십개의 쓰레드를 full로 활용하면서 동작할 수 있게 된다.
- actor의 State가 공유되지 않고 지역적으로 머물러 있으며, 변화는 메시지로 전파된다.
Actors handle error situations gracefully
액터는 에러를 우아하게 처리한다. call stack이 없으므로(위에서 언급한 하나의 쓰레드에서 쭉 들어가서 리턴 리턴 하는 방식의 패러다임) 에러에 대한 상황이 바뀌었으니 우리도 에러를 다르게 처리할 수 있다. 두가지 고려해야 할 에러들이 있다.
- 첫 케이스는 타겟 엑터로부터 위임받은 task를 실패한 경우이다. 이럴 때는, 타겟 액터에 의해 캡슐화된 서비스는 (즉, 명령을 보낸 액터는) 손상되지 않고 그 자체적으로 에러만 발생한 것이 된다. 서비스 액터는 송신자에게 메시지 안에 에러가 났음을 명시해서 전달하면 된다. 에러는 도메인의 한 부분이고, 따라서 일반적인 메시지일 뿐이다.
- 두번째 케이스는 서비스 스스로 내부적인 실패를 한 경우이다. AKKA는 모든 액터가 tree-like 구조를 강제한다. (새로운 엑터는 부모 액터에게 종속됨) OS에서의 프로세스 구조와 비슷하다. 프로세스에서 처리하는 것과 마찬가지로, 만약 actor가 실패를 하게 되면, 부모 액터가 어떻게 대처할지를 결정 해 준다. 만약 parent actor가 멈춘다면, children actor들도 재귀적으로 종료된다. 이걸 supervision and it is central to Akka. 라고 부른다고 한다.
일반적으로, 관리 규칙은 child actor을 생성시에 정의 해 준다. children은 절대로 조용히 사망하지 않고, 실패를 알려주거나 멈췄음을 알려준다. 항상 액터를 관리하기 위한 관련 엔티티가 있다.
Overview of Akka libraries and modules
아래의 기능들이 AKka OSS에 포함되어 있으며, 추후에 또 설명이 나온다.
- Actor library
- Remoting
- Cluster
- Cluster Sharding
- Cluster Singleton
- Persistence
- Distributed Data
- Streams
- HTTP
그 외에도 아래와 같은 설명들이 써있다.
With a Lightbend Platform Subscription, you can use Akka Enhancements that includes:
- Split Brain Resolver — Detects and recovers from network partitions, eliminating data inconsistencies and possible downtime.
- Configuration Checker — Checks for potential configuration issues and logs suggestions.
- Diagnostics Recorder — Captures configuration and system information in a format that makes it easy to troubleshoot issues during development and production.
- Thread Starvation Detector — Monitors an Akka system dispatcher and logs warnings if it becomes unresponsive.
- Kubernetes Lease — Monitors an Akka system dispatcher and logs warnings if it becomes unresponsive.
- Fast Failover — Fast failover for Cluster Sharding.
Akka Persistence Enhancements:
- Multi-DC Persistence — For active-active persistent entities across multiple data centers.
- GDPR for Akka Persistence — Data shredding can be used to forget information in events.
This page does not list all available modules, but overviews the main functionality and gives you an idea of the level of sophistication you can reach when you start building systems on top of Akka.
Actor library
libraryDependencies += "com.typesafe.akka" %% "akka-actor-typed" % "2.6.3"Core Akka 라이브러리는 akka-actor-typed 지만, Actor은 AKKA 라이브러리 전반에 걸쳐서 쓰이며, 동시성을 제공하고, 분산 처리 시스템에 관련된 어려움들을 처리하기 쉽게 도와준다. object에서와 다르게, Actor은 그의 state만 캡슐화 하는 것이 아니라 그 실행 또한 캡슐화 한다. 액터간 통신은 메소드 콜이 아닌 메시지를 전달하는 방식을 통해서 이루어진다.
Challenges that actors solve include the following:
- How to build and design high-performance, concurrent applications.
- How to handle errors in a multi-threaded environment.
- How to protect my project from the pitfalls of concurrency.
Remoting
libraryDependencies += "com.typesafe.akka" %% "akka-remote" % "2.6.3"
Remoting은 actor들이 다른 컴퓨터들 사이에서 끊김없이 메시지를 주고받을 수 있도록 해준다. JAR 아티팩트로 분산되어있는 동안, Remoting은 라이브러리보다는 모듈에 가깝다. 주로 설정을 건드리며, API 자체는 별로 없다. Actor model덕분에, local이나 remote나 같은 방법으로 메시지를 보내게 된다. (직접 쓸 일은 많이 없을 것.)
Cluster
libraryDependencies += "com.typesafe.akka" %% "akka-cluster-typed" % "2.6.3"만약에 서로 협력해서 문제를 풀어나가는 actor system들의 집합이 있다고 할 때, 이 시스템을 통제가 잘 된 상태로 감독하고 싶을 것이다. Remoting가 component들을 서로 통신하게 만들어 준다면, Clustering은 이 컴포넌트들을 메타시스템 안에 멤버십 프로토콜로 묶어서 넣고 싶은 것이다. (진짜 이렇게 써있음. While Remoting solves the problem of addressing and communicating with components of remote systems, Clustering gives you the ability to organize these into a “meta-system” tied together by a membership protocol. ) 주로 Remoting을 직접적으로 쓰기 보다는 Cluster module을 사용하는 것이 좋다. Clustering은 리모팅 위에서 돌아가는 추가적인 서비스를 제공해 준다.
Challenges the Cluster module solves include the following:
- How to maintain a set of actor systems (a cluster) that can communicate with each other and consider each other as part of the cluster.
- How to introduce a new system safely to the set of already existing members.
- How to reliably detect systems that are temporarily unreachable.
- How to remove failed hosts/systems (or scale down the system) so that all remaining members agree on the remaining subset of the cluster.
- How to distribute computations among the current set of members.
- How to designate members of the cluster to a certain role, in other words, to provide certain services and not others.
Cluster Sharding
libraryDependencies += "com.typesafe.akka" %% "akka-cluster-sharding-typed" % "2.6.3"샤딩은 액터들을 AKKA 클러스터의 멤버 액터들로 분배시키는 문제를 도와준다. Sharding은 대부분 퍼시스턴스와 함께 사용 되어 많은 퍼시스턴스 엔티티 세트(액터 기반의)를 클러스터 멤버와 균형을 맞추고, 멤버가 crash되거나 사라질 때 다른 노드로 migrate 하는 패턴이다.
Challenges that Sharding solves include the following:
- How to model and scale out a large set of stateful entities on a set of systems.
- How to ensure that entities in the cluster are distributed properly so that load is properly balanced across the machines.
- How to ensure migrating entities from a crashed system without losing the state.
- How to ensure that an entity does not exist on multiple systems at the same time and hence keeps consistent.
Cluster Singleton
libraryDependencies += "com.typesafe.akka" %% "akka-cluster-singleton" % "2.6.3"분산 시스템에서 일반적인 use case는 주어진 작업을 담당하는 단일 엔티티가 클러스터의 다른 멤버간에 공유되고, 호스트 시스템이 실패하는 경우 마이그레이션되는 것이다. 이로 인해 전체 클러스터에 공통 병목 현상이 발생하여 확장이 제한되는 반면, 이 패턴을 피할 수 없는 시나리오도 있다. 클러스터 싱글 톤은 클러스터가 특정 액터를 호스트 할 액터 시스템을 선택할 수 있게 하는 반면 다른 시스템은 항상 해당 서비스와 상관없이 상기 서비스에 액세스 할 수 있다.
The Singleton module can be used to solve these challenges:
- How to ensure that only one instance of a service is running in the whole cluster.
- How to ensure that the service is up even if the system hosting it currently crashes or shuts down during the process of scaling down.
- How to reach this instance from any member of the cluster assuming that it can migrate to other systems over time.
Persistence
libraryDependencies += "com.typesafe.akka" %% "akka-persistence-typed" % "2.6.3"OOP안의 object들과 마찬가지로, actor들은 그들의 state를 휘발성인 메모리 안에 유지한다. 그래서, 시스템이 꺼지면 메모리 안에 있던 정보는 유실된다. Persistence는 actors에게 현재 상태를 이끌어내는 event가 계속되게(persist) 할 수 있게 해준다. 시작할 때, events는 액터로부터 호스트된 엔티티의 state를 회복시키기 위해서 반복(replay)될 수 있다. 이벤트 스트림은 쿼리(조회) 되며, 추가적인 프로세싱 파이프라인이나. alternate views(번역 모르겠다)에 제공될 수 있다.
Persistence tackles the following challenges:
- How to restore the state of an entity/actor when system restarts or crashes.
- How to implement a CQRS system.
- How to ensure reliable delivery of messages in face of network errors and system crashes.
- How to introspect domain events that have led an entity to its current state.
- How to leverage Event Sourcing in your application to support long-running processes while the project continues to evolve.
Distributed Data
libraryDependencies += "com.typesafe.akka" %% "akka-cluster-typed" % "2.6.3"최종적으로 consistency가 허용된다면, AKKA 클러스터의 노드간에 데이터를 공유하는 것이 가능하며, 클러스터 파티션이 있더라도 읽기와 쓰기를 동시에 할 수 있다. 이것은 서로 다른 노드에 동시에 쓸 수 있고 나중에 예측 가능한 방법으로 병합되는 Conflict Free Replicated Data Types(CRTDs)를 사용하여 가능하다.
Distributed Data is intended to solve the following challenges:
- How to accept writes even in the face of cluster partitions.
- How to share data while at the same time ensuring low-latency local read and write access.
Streams
libraryDependencies += "com.typesafe.akka" %% "akka-stream-typed" % "2.6.3"Actor은 동시성을 위한 기본적인 모델이지만, 사용자가 사용에 필요한 동일한 패턴을 반복해서 구현해야 하는 패턴이 있다. 일반적인 시나리오로, 그래프가 열심히 뒤엉켜있는 상황에서, 어떤 빠른 process가, 느린 또 다른 프로세스를 넘어서면 안되는 경우가 있을 수 있다. 스트림은 이러한 processing 네트워크 작성을 단순화하고 백그라운드의 모든 세부 사항을 처리하며 안전하고 형식화 된 합성 가능한 프로그래밍 모델을 제공하는 actor에 대해 상위 레벨의 추상화를 제공한다. Streams 는 서드 파티 구현들의 융합을 가능하게 하는 Reactive Streams standard 의 구현이기도 하다.
Streams solve the following challenges:
- How to handle streams of events or large datasets with high performance, exploiting concurrency and keeping resource usage tight.
- How to assemble reusable pieces of event/data processing into flexible pipelines.
- How to connect asynchronous services in a flexible way to each other with high performance.
- How to provide or consume Reactive Streams compliant interfaces to interface with a third party library.
HTTP
Akka HTTP는 Akka와 분리된 모듈이다.
API를 원격으로, 내부 또는 외부로, 제공하기 위한 사실상의 표준은 HTTP이다. Akka는 HTTP 서비스를 만들고 serve하는 tool들을 제공하며, 다른 서비스들을 사용하는 데에 사용할 수 있는 클라이언트를 제공함으로써, HTTP 서비스들을 만들거나 이용할 수 있게 하는 라이브러리를 제공한다. (아니 문장들이 왜 일케 길고 어렵냐 ;; ) 이러한 tool들은 Akka Streams의 기본 모델을 활용하여 대규모 데이터 또는 실시간 이벤트를 스트리밍 받거나 하는 데 특히 적합하다.
Some of the challenges that HTTP tackles:
- How to expose services of a system or cluster to the external world via an HTTP API in a performant way.
- How to stream large datasets in and out of a system using HTTP.
- How to stream live events in and out of a system using HTTP.
Introduction to the Example
간접적으로 이 튜토리얼을 통해 코어 로직을 보도록 하자.
Prerequisites
아카 퀵스타트 가이드 하고 오랜다.
IoT example use case
IoT 장치들에서 센서들이 뱉는 데이터를 리포트 하는 시스템을 만들기 위해 Akka를 쓰는걸 목표로 한다. 본 예시는 온도 읽는걸 예시로 한다.
튜토리얼 앱은 두 메인 컨셉을 포함한다.
Device data collection : 원격 장치로부터 지속적으로 local의 상태를 표현해준다. 여러 센서 장치는 하나의 장치 그룹으로 조직화 되어 있다.
User dashboard : 주기적으로 장치로부터 데이터를 받아들이고 유저에게 리포트를 보여준다.

What you will learn in this tutorial
This tutorial introduces and illustrates:
- The actor hierarchy and how it influences actor behavior
- How to choose the right granularity for actors
- How to define protocols as messages
- Typical conversational styles
Part 1: Actor Architecture
Dependency
아래 디펜던시 추가
libraryDependencies += "com.typesafe.akka" %% "akka-actor-typed" % "2.6.3"Introduction
아카를 쓰면 low level code의 사용 없이도 기본적인 행동들을 잘 할 수 있게 된다~
The Akka actor hierarchy
아카 안의 액터는 항상 부모에게 소속되어 있다. 액터는 ActorContext.spawn()을 통해서 만든다. 생성한 액터는 생성된 액터의 부모가 된다.
아래 일러스트에서 볼 수 있듯, 모든 액터는 User guardian이라는 공통 부모를 가지고 있다. 이는 ActorSystem을 만들 때 정의된다. 액터의 생성은 적당한 URL로 된 레퍼런스를 리턴한다.예를 들어, someActor이 user guardian 으로부터 context.spawn(someBehavior, "someActor") 을 통해 만들어졌다면 이 액터의 레퍼런스는 /user/someActor 이 될 것이다.
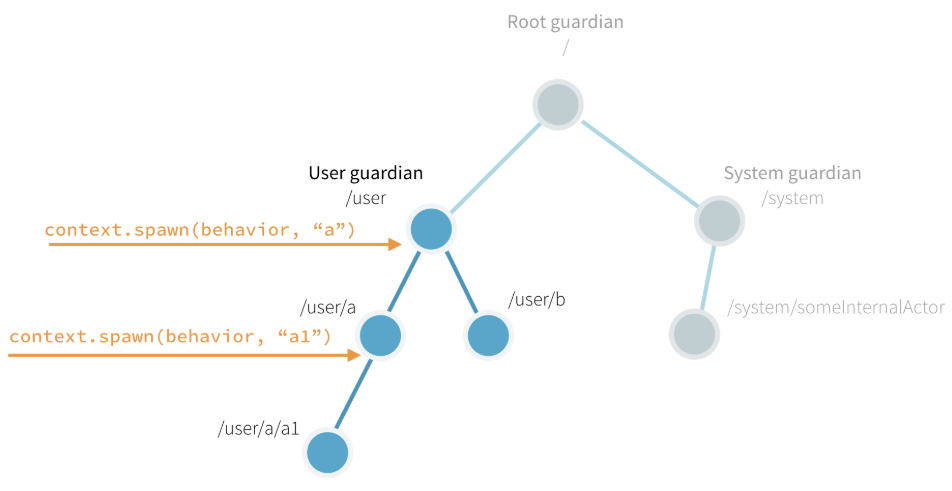
사실, 첫 액터를 우리가 만들기 전에 Akka 는 이미 두 액터를 시스템 안에 포함하고 있다. 이 built-in actor 친구들은 guardian을 포함하고 있다. 가디언 액터는 다음을 포함한다.
- / the so-called root guardian. This is the parent of all actors in the system, and the last one to stop when the system itself is terminated.
- /system the system guardian. Akka or other libraries built on top of Akka may create actors in the system namespace.
- /user the user guardian. This is the top level actor that you provide to start all other actors in your application.
Actor의 계층을 쉽게 볼 수 있는 방법은 ActorRef를 print 해 보는 것이다.
In your Hello World project, navigate to the com.lightbend.akka.sample package and create a new Scala file called ActorHierarchyExperiments.scala here. Copy and paste the code from the snippet below to this new source file. Save your file and run sbt "runMain com.lightbend.akka.sample.ActorHierarchyExperiments" to observe the output.
import akka.actor.typed.ActorSystem
import akka.actor.typed.Behavior
import akka.actor.typed.scaladsl.AbstractBehavior
import akka.actor.typed.scaladsl.ActorContext
import akka.actor.typed.scaladsl.Behaviors

object PrintMyActorRefActor {
  def apply(): Behavior[String] =
    Behaviors.setup(context => new PrintMyActorRefActor(context))
}

class PrintMyActorRefActor(context: ActorContext[String]) extends AbstractBehavior[String](context) {

  override def onMessage(msg: String): Behavior[String] =
    msg match {
      case "printit" =>
        val secondRef = context.spawn(Behaviors.empty[String], "second-actor")
        println(s"Second: $secondRef")
        this
    }
}

object Main {
  def apply(): Behavior[String] =
    Behaviors.setup(context => new Main(context))

}

class Main(context: ActorContext[String]) extends AbstractBehavior[String](context) {
  override def onMessage(msg: String): Behavior[String] =
    msg match {
      case "start" =>
        val firstRef = context.spawn(PrintMyActorRefActor(), "first-actor")
        println(s"First: $firstRef")
        firstRef ! "printit"
        this
    }
}

object ActorHierarchyExperiments extends App {
  val testSystem = ActorSystem(Main(), "testSystem")
  testSystem ! "start"
}
결과는 다음과 같다.
First: Actor[akka://testSystem/user/first-actor#1053618476]
Second: Actor[akka://testSystem/user/first-actor/second-actor#-1544706041]
Notice the structure of the references:
- Both paths start with akka://testSystem/. Since all actor references are valid URLs, akka:// is the value of the protocol field.
- Next, just like on the World Wide Web, the URL identifies the system. In this example, the system is named testSystem, but it could be any other name. If remote communication between multiple systems is enabled, this part of the URL includes the hostname so other systems can find it on the network.
- Because the second actor’s reference includes the path /first-actor/, it identifies it as a child of the first.
- The last part of the actor reference, #1053618476 or #-1544706041 is a unique identifier that you can ignore in most cases.
왜 이런 계층구조가 필요 한 것일까? 어디에 이런것들을 쓸까?
이 이유는 actor의 lifecycle을 잘 관리하기 위해서이다.
The actor lifecycle
액터는 생성되었을 때 존재하게 되며, 유저가 삭제할 경우 멈추게 된다. 만약 한 액터가 멈추면 그 자식 액터들도 줄줄히 재귀적으로 멈추게 된다. 이 방법을 통해 우리는 자원이 새어나가는 것을 막을 수 있다. (무엇인가가 열려있는 상태에서 참조가 끊겨 영원히 닫을수 없다거나 하는 불상사를 막을 수 있다) 특히 멀티스레드 low-level 코딩 할 때는 진짜 이거 처리하기가 끔찍하다.
사용자 정의 정지 메시지에 대한 답변이나 혹은 엑터가 그 일을 모두 끝냈을 때 등의 케이스로 액터를 멈출 때는 액터 안에서 스스로 멈추도록 Behaviors.stopped()를 리턴하는게 권장되는 패턴이다. 자식 액터를 멈추는 것도 context.stop(childRef)를 호출하면서 기술적으로는 가능하지만, 이 방법을 통해서는 자식이 아닌 임의의 액터를 멈추는게 불가하다.
Akka 액터 API는 lifecycle 시그널을 주는데, 예를들어 PostStop은 액터가 멈추고 나서 전송이 된다. 그 이후로는 아무런 메시지가 프로세싱 되지 않는다. 한번 써보자. 아래의 두 actor classes를 프로젝트에 추가 해 보자.
object StartStopActor1 {
  def apply(): Behavior[String] =
    Behaviors.setup(context => new StartStopActor1(context))
}

class StartStopActor1(context: ActorContext[String]) extends AbstractBehavior[String](context) {
  println("first started")
  context.spawn(StartStopActor2(), "second")

  override def onMessage(msg: String): Behavior[String] =
    msg match {
      case "stop" => Behaviors.stopped
    }

  override def onSignal: PartialFunction[Signal, Behavior[String]] = {
    case PostStop =>
      println("first stopped")
      this
  }

}

object StartStopActor2 {
  def apply(): Behavior[String] =
    Behaviors.setup(new StartStopActor2(_))
}

class StartStopActor2(context: ActorContext[String]) extends AbstractBehavior[String](context) {
  println("second started")

  override def onMessage(msg: String): Behavior[String] = {
    // no messages handled by this actor
    Behaviors.unhandled
  }

  override def onSignal: PartialFunction[Signal, Behavior[String]] = {
    case PostStop =>
      println("second stopped")
      this
  }

}
그리고 메인에다가 아래 코드를 실행 시켜 보자.
val first = context.spawn(StartStopActor1(), "first")
first ! "stop"
이런 결과가 나온다.
first started
second started
second stopped
first stopped
(참고로 나는 이렇게 추가 했다)
class Main(context: ActorContext[String]) extends AbstractBehavior[String](context) {
  override def onMessage(msg: String): Behavior[String] =
    msg match {
      case "start" =>
        val firstRef = context.spawn(PrintMyActorRefActor(), "first-actor")
        println(s"First: $firstRef")
        firstRef ! "printit"
        this
      case "start2" =>
        val first = context.spawn(StartStopActor1(), "first")
        first ! "stop"
        this
    }
}

object ActorHierarchyExperiments extends App {
  val testSystem = ActorSystem(Main(), "testSystem")
  testSystem ! "start2"
}
Failure handling
자식과 부모는 그들의 라이프사이클로 묶여있다. 어떤 엑터가 실패하면 (onMessage로 부터 예외가 발생하거나 처리되지 않은 예외가 터졌을 때) 실패한 정보는 상위 엑터로 전달되고, 그 상태에서 상위 액터는 어떻게 대응할 것인지를 결정한다. 관리 규칙은 일반적으로 부모 액터가 자식 액터를 만들 때 정의된다. 이 방법을 통해, 부모는 자식의 관리자처럼 행동 한다. 기본 세팅된 관리 전략(supervision strategy)은 자식을 멈추는 것이다. 특별히 정의하지 않는다면 모든 실패한 액터는 멈출 것이다.
간단한 실험을 통해 재시작 관리 전략을 살펴보자.
object SupervisingActor {
  def apply(): Behavior[String] =
    Behaviors.setup(context => new SupervisingActor(context))
}

class SupervisingActor(context: ActorContext[String]) extends AbstractBehavior[String](context) {
  private val child = context.spawn(
    Behaviors.supervise(SupervisedActor()).onFailure(SupervisorStrategy.restart),
    name = "supervised-actor")

  override def onMessage(msg: String): Behavior[String] =
    msg match {
      case "failChild" =>
        child ! "fail"
        this
    }
}

object SupervisedActor {
  def apply(): Behavior[String] =
    Behaviors.setup(context => new SupervisedActor(context))
}

class SupervisedActor(context: ActorContext[String]) extends AbstractBehavior[String](context) {
  println("supervised actor started")

  override def onMessage(msg: String): Behavior[String] =
    msg match {
      case "fail" =>
        println("supervised actor fails now")
        throw new Exception("I failed!")
    }

  override def onSignal: PartialFunction[Signal, Behavior[String]] = {
    case PreRestart =>
      println("supervised actor will be restarted")
      this
    case PostStop =>
      println("supervised actor stopped")
      this
  }

}
다음과 같이 실행하자.
val supervisingActor = context.spawn(SupervisingActor(), "supervising-actor")
supervisingActor ! "failChild"
출력은 다음과 같다.
supervised actor started
supervised actor fails now
supervised actor will be restarted
supervised actor started
[ERROR] [11/12/2018 12:03:27.171] [ActorHierarchyExperiments-akka.actor.default-dispatcher-2] [akka://ActorHierarchyExperiments/user/supervising-actor/supervised-actor] Supervisor akka.actor.typed.internal.RestartSupervisor@1c452254 saw failure: I failed!
java.lang.Exception: I failed!
	at typed.tutorial_1.SupervisedActor.onMessage(ActorHierarchyExperiments.scala:113)
	at typed.tutorial_1.SupervisedActor.onMessage(ActorHierarchyExperiments.scala:106)
	at akka.actor.typed.scaladsl.AbstractBehavior.receive(AbstractBehavior.scala:59)
	at akka.actor.typed.Behavior$.interpret(Behavior.scala:395)
	at akka.actor.typed.Behavior$.interpretMessage(Behavior.scala:369)
	at akka.actor.typed.internal.InterceptorImpl$$anon$2.apply(InterceptorImpl.scala:49)
	at akka.actor.typed.internal.SimpleSupervisor.aroundReceive(Supervision.scala:85)
	at akka.actor.typed.internal.InterceptorImpl.receive(InterceptorImpl.scala:70)
	at akka.actor.typed.Behavior$.interpret(Behavior.scala:395)
	at akka.actor.typed.Behavior$.interpretMessage(Behavior.scala:369)
주목할 점은 에러 메시지가 맨 마지막에 나왔다는 점과 PreRestart의 메시지가 생성 이전에 나왔다는 점 정도..? 에러 호출하는 친구는 또 다른 경로로 빠져서 순서가 다른 것이다.
Part 2: Creating the First Actor
Introduction
우리의 IoT시스템의 최상의 컴포넌트를 어떻게 엑터와 대응시킬지 생각 해 보자.
아래와 같이 하면 어떨까? ㅎ
우선 우리는 우리의 첫 액터 IotSupervisor을 만들어보자. 튜토리얼 어플리케이션으로부터 시작 ㄱㄱ
- Create a new IotSupervisor source file in the com.lightbend.akka.sample package.
- Paste the following code into the new file to define the IotSupervisor.
import akka.actor.typed.Behavior
import akka.actor.typed.PostStop
import akka.actor.typed.Signal
import akka.actor.typed.scaladsl.AbstractBehavior
import akka.actor.typed.scaladsl.ActorContext
import akka.actor.typed.scaladsl.Behaviors

object IotSupervisor {
  def apply(): Behavior[Nothing] =
    Behaviors.setup[Nothing](context => new IotSupervisor(context))
}

class IotSupervisor(context: ActorContext[Nothing]) extends AbstractBehavior[Nothing](context) {
  context.log.info("IoT Application started")

  override def onMessage(msg: Nothing): Behavior[Nothing] = {
    // No need to handle any messages
    Behaviors.unhandled
  }

  override def onSignal: PartialFunction[Signal, Behavior[Nothing]] = {
    case PostStop =>
      context.log.info("IoT Application stopped")
      this
  }
}
이전의 액터 예시 코드와 비슷하지만 logging을 context.log를 통해서 했다는 점을 주목하자.
main 진입 포인트를 제공하기 위해서 IotApp 오브젝트를 추가하자.
import akka.actor.typed.ActorSystem

object IotApp {

  def main(args: Array[String]): Unit = {
    // Create ActorSystem and top level supervisor
    ActorSystem[Nothing](IotSupervisor(), "iot-system")
  }

}
Part 3: Working with Device Actors
Introduction
이제까지는 액터 시스템을 크게 어떻게 봐야 하는지, 즉, 컴포넌트들이 어떻게 표현되어야 하는지, 어떤 구조로 액터들이 정렬되어야 하는지에 대한 것이었다. 이제는, 액터를 디테일하게 한번 바라 볼 것이다.
일반적으로 object를 가지고 작업을 할 때면 API를 interface로 작업하곤 한다. abstract method를 implementation으로 채워나가는 것이다. Actor의 세계에서는 protocol이 interface의 자리를 대체한다. 프로그래밍 언어에서 일반적인 프로토콜을 형식화 할 수는 없지만, 우리는 가장 기본적인 요소인 메시지를 만들 수 있다. 따라서, 우리는 device actor에게 보낼 멧기지를 정의하는 것 부터 시작할 것이다.
일반적으로, 메시지는 카테고리 또는 패턴으로 분류된다. 이러한 패턴을 식별하게 되면 이를 선택하고 구현하기가 더 쉬워진다는 것을 알게 될 것이다. 첫 예제는 request-respond 메시지 패턴을 보여준다.
Identifying messages for devices
Divice actor가 하는일은 간단하다.
- Collect temperature measurements
- When asked, report the last measured temperature
그치만, 장비가 맨 처음 시작 할 때는 온도 측정이 안 되어 있는 상태일 것이므로 이런 케이스에 대해서도 처리 해 주어야 한다. 이것은 또한 디바이스 액터가 빈 결과를 반환할 수 있기 때문에 액터의 쿼리 파트에 대해서 write하지 않고 테스트 할 수 있게 한다.
현재 온도를 받고 나서, 액터는
- Waits for a request for the current temperature.
- Responds to the request with a reply that either:
- contains the current temperature or,
- indicates that a temperature is not yet available.
우리는 두 메시지가 필요한데, 하나는 request를 위한 것이고 다른 하나는 reply를 위한 것이다. 우리의 첫 코드는 다음과 같을 것이다.
import akka.actor.typed.ActorRef

object Device {
  sealed trait Command
  final case class ReadTemperature(replyTo: ActorRef[RespondTemperature]) extends Command
  final case class RespondTemperature(value: Option[Double])
}ReadTemperature가 ActorRef[RespondTemperature]를 보내서 request를 reply할 때의 주소로 사용하고 있는 것을 주의 깊게 보자.
다만, 스케일이 커지면
- local과 remote 메시지 간에는 유의미한 latency 차이가 날 것이다.
- 리모트 메시지는 통신하는 과정이 추가되므로 데이터의 신뢰성에 더욱 유의해야 한다.
- 로컬 전송은 전송되는 기본 개체에 대한 제한없이 동일한 JVM 내에서 메시지에 대한 참조를 전달하지만 remote 전송은 메시지 크기를 제한한다.
액터가 중간에 사망하거나 실패하는 바람에 메시지가 소실될 수 있다. 이 때, 액터는 잠시후에 복구 되겠지만 메시지는 손실된다. 따라서 액터를 모든 메시지가 사라질 수 있다는 가정을 하며 비관적으로 작성하는 것이 중요하다.
그렇지만 프로토콜의 유연성의 필요성을 더 이해하기 위해서는 아카 메시지 순서와 delivery guarantees(전달 보장)에 대해 생각하는 것이 중요하다. Akka는 메시지 전송에 대해 다음과 같은 behavior을 제공한다.
- At-most-once delivery, that is, no guaranteed delivery. (단 한번의 전송을 한다, 즉 보장되지 않은 전송을 한다)
- Message ordering is maintained per sender, receiver pair. (메시지 순서는 sender-receiver 쌍에 대해서는 보장이 된다)
Message delivery
메시징 하위 시스템에 의해서 제공되는 Delivery semantics는 일반적으로 다음 카테고리에 속한다.
- At-most-once delivery — each message is delivered zero or one time; in more causal terms it means that messages can be lost, but are never duplicated. ( 메시지는 0번이나 1번 전송된다. 사라질 수는 있어도 복제되지 않는다)
- At-least-once delivery — potentially multiple attempts are made to deliver each message, until at least one succeeds; again, in more causal terms this means that messages can be duplicated but are never lost. ( 메시지는 복제될 수 있지만 사라질 수는 없다. )
- Exactly-once delivery — each message is delivered exactly once to the recipient; the message can neither be lost nor be duplicated. (메세지는 사라지지도 않고 복제되지도 않는다)
첫 behavior은 Akka에서 사용하고 있으며 가장 높은 성능을 보장한다. fire-and-forget 느낌으로 작성이 가능하며 그게 제일 오버헤드가 적다.
두번째로 at-least-once는 전송 시점의 손실을 재 전송을 통해 해결하려고 한다. 오버헤드를 발생시킨다.
세번째는 제일 비싼 연산인데, 제대로 전송이 되었는지를 항상 확인하고 있는다.
우선 guarantee(보장)이라는 것에 대해서 제대로 정의를 해 보자. 어떨때 메시지가 제대로 전송되었다고 할 수 있을까? (사람이 언제 죽는다고 생각하나?)
- When the message is sent out on the network? 메시지가 네트워크에서 출발할 때?
- When the message is received by the target actor’s host? 목표 액터의 호스트에 도착했을 때?
- When the message is put into the target actor’s mailbox? 메시지가 타겟 엑터의 메일 박스에 들어갔을 때?
- When the message target actor starts to process the message? 메시지의 타겟 액터가 메시지를 처리하기 시작했을 때?
- When the target actor has successfully processed the message? 타겟 엑터가 메시지의 처리를 끝냈을 때?
대부분의 프로토콜은 4나 5번쯤에서 보장이 되었다고 말한다. 근데 이게 진짜 유용할까? 이 영향을 이해하기 위해서는, 예시를 보자. 한 사용자가 주문을 했으며, 주문 데이터베이스에 실제로 존재하면 주문이 성공적이었다고 말하고 싶은 상황이라고 하자.
우리가 메시지의 성공적인 처리에 의존하고 있다면, 액터는 주문이 들어왔을 때 이 주문을 검증, 연산, 그리고 데이터베이스에 넣을 의무가 있는 내부 API에 보내졌을 때 success를 보고하게 될 것이다. 그렇지만 API가 불려지자 마자 다음의 일들이 일어날 수 있다.
- host 가 crash된다.
- Deserialization 이 실패한다.
- Validation이 실패한다.
- database가 사용 불가다.
- programming error이 발생했다.
등등의 이유를 볼 때, guarantee of delivery는 domain level guarantee가 아니라는 점을 알 수 있게 된다. 여러 레이어를 거치고 나서야 최종적인 성공을 알 수 있다면 바로 리턴할 수 없거나, 아니면 오랫동안 기다리는 수 밖에 없다. 아카는 이런 이유로 어플리케이션이 스스로 책임을 지게 하는 것이다. 즉, 당신은 아카가 제공하는 툴을 사용하여 스스로 구현해야 한다.
Message Ordering
별 내용 아니다. 당연한 내용
Adding flexibility to device messages
우리가 처음에 만들었던 쿼리 프로토콜은 잘 만들었었지만, 분산 어플리케이션 환경에는 어울리지 않았다.
우리는 요청한 액터에 재전송을 구현하거나 하는 기능 등이 필요할 수 있다. 따라서 request와 response를 연관짓기 위해서 request한 액터의 주소를 추가할 수 있다. (코드상에는 나중에 추가 할 것이다)
sealed trait Command
final case class ReadTemperature(requestId: Long, replyTo: ActorRef[RespondTemperature]) extends Command
final case class RespondTemperature(requestId: Long, value: Option[Double])
Implementing the device actor and its read protocol
각 액터는 어떤 메시지를 입력으로 받을지를 정해놓는다. 우리의 디바이스 액터는 응답으로 주어진 쿼리와 같은 ID 파라미터를 사용해야 할 의무가 있다. 코드는 다음과 같아 질 것이다.
import akka.actor.typed.Behavior
import akka.actor.typed.scaladsl.AbstractBehavior
import akka.actor.typed.scaladsl.ActorContext
import akka.actor.typed.scaladsl.Behaviors

object Device {
  def apply(groupId: String, deviceId: String): Behavior[Command] =
    Behaviors.setup(context => new Device(context, groupId, deviceId))

  sealed trait Command
  final case class ReadTemperature(requestId: Long, replyTo: ActorRef[RespondTemperature]) extends Command
  final case class RespondTemperature(requestId: Long, value: Option[Double])
}

class Device(context: ActorContext[Device.Command], groupId: String, deviceId: String)
    extends AbstractBehavior[Device.Command](context) {
  import Device._

  var lastTemperatureReading: Option[Double] = None

  context.log.info2("Device actor {}-{} started", groupId, deviceId)

  override def onMessage(msg: Command): Behavior[Command] = {
    msg match {
      case ReadTemperature(id, replyTo) =>
        replyTo ! RespondTemperature(id, lastTemperatureReading)
        this
    }
  }

  override def onSignal: PartialFunction[Signal, Behavior[Command]] = {
    case PostStop =>
      context.log.info2("Device actor {}-{} stopped", groupId, deviceId)
      this
  }

}
groupId deviceId 파라미터는 device 아이디와 어떤 그룹에 속해있는지를 나타낸다. 나중에 쓸 것.
- The apply method in the companion object defines how to construct the Behavior for the Device actor. The parameters include an ID for the device and the group to which it belongs, which we will use later.
- The messages we reasoned about previously are defined in the companion object.
- In the Device class, the value of lastTemperatureReading is initially set to None, and the actor will report it back if queried.
Testing the actor
위의 액터를 기반으로, 우리는 테스트를 작성할 수 있다. com.lightbend.akka.sample 는 당신의 프로젝트의 테스트 트리를 패키지하고 있는데, 다음 코드를 DeviceSpec.scala 파일에 있다.
sbt prompt에 test라고 치면 실행이 가능하다.
import akka.actor.testkit.typed.scaladsl.ScalaTestWithActorTestKit
import org.scalatest.wordspec.AnyWordSpecLike

class DeviceSpec extends ScalaTestWithActorTestKit with AnyWordSpecLike {
  import Device._

  "Device actor" must {

    "reply with empty reading if no temperature is known" in {
      val probe = createTestProbe[RespondTemperature]()
      val deviceActor = spawn(Device("group", "device"))

      deviceActor ! Device.ReadTemperature(requestId = 42, probe.ref)
      val response = probe.receiveMessage()
      response.requestId should ===(42)
      response.value should ===(None)
    }
}
Adding a write protocol
프로토콜을 작성하는 목적은 액터가 온도를 포함한 메시지를 받았을 때 currentTemperature 필드를 업데이트 하고자 하기 떄문이다. 다시 한번, 다음과 같이 프로토콜을 아주 간단한 메시지로 정의하고 싶을 것이다.
sealed trait Command
final case class RecordTemperature(value: Double) extends Command
그렇지만 이 접근 방법은 온도 기록 메시지의 발신자가 메시지가 처리 되었는지 그렇지 못한지를 확신할 수 없는 방법이다. 우리의 경우에는, 우리의 마지막 온도 기록을 업데이트 하고 나서 발신자에게 접수 통지를 보내길 원한다. 예를 들어, TemperatureRecorded 같은 것 말이다. ID 필드를 주어 유연성을 높이는 것이 좋다.
final case class RecordTemperature(requestId: Long, value: Double, replyTo: ActorRef[TemperatureRecorded])
    extends Command
final case class TemperatureRecorded(requestId: Long)
Actor with read and write messages
다 합치면, 아래와 같은 코드가 된다.
import akka.actor.typed.ActorRef
import akka.actor.typed.Behavior
import akka.actor.typed.PostStop
import akka.actor.typed.Signal
import akka.actor.typed.scaladsl.AbstractBehavior
import akka.actor.typed.scaladsl.ActorContext
import akka.actor.typed.scaladsl.Behaviors
import akka.actor.typed.scaladsl.LoggerOps

object Device {
  def apply(groupId: String, deviceId: String): Behavior[Command] =
    Behaviors.setup(context => new Device(context, groupId, deviceId))

  sealed trait Command

  final case class ReadTemperature(requestId: Long, replyTo: ActorRef[RespondTemperature]) extends Command
  final case class RespondTemperature(requestId: Long, value: Option[Double])

  final case class RecordTemperature(requestId: Long, value: Double, replyTo: ActorRef[TemperatureRecorded])
      extends Command
  final case class TemperatureRecorded(requestId: Long)
}

class Device(context: ActorContext[Device.Command], groupId: String, deviceId: String)
    extends AbstractBehavior[Device.Command](context) {
  import Device._

  var lastTemperatureReading: Option[Double] = None

  context.log.info2("Device actor {}-{} started", groupId, deviceId)

  override def onMessage(msg: Command): Behavior[Command] = {
    msg match {
      case RecordTemperature(id, value, replyTo) =>
        context.log.info2("Recorded temperature reading {} with {}", value, id)
        lastTemperatureReading = Some(value)
        replyTo ! TemperatureRecorded(id)
        this

      case ReadTemperature(id, replyTo) =>
        replyTo ! RespondTemperature(id, lastTemperatureReading)
        this
    }
  }

  override def onSignal: PartialFunction[Signal, Behavior[Command]] = {
    case PostStop =>
      context.log.info2("Device actor {}-{} stopped", groupId, deviceId)
      this
  }

}
그리고 테스트도 다시 작성 긔긔하긔
"reply with latest temperature reading" in {
  val recordProbe = createTestProbe[TemperatureRecorded]()
  val readProbe = createTestProbe[RespondTemperature]()
  val deviceActor = spawn(Device("group", "device"))

  deviceActor ! Device.RecordTemperature(requestId = 1, 24.0, recordProbe.ref)
  recordProbe.expectMessage(Device.TemperatureRecorded(requestId = 1))

  deviceActor ! Device.ReadTemperature(requestId = 2, readProbe.ref)
  val response1 = readProbe.receiveMessage()
  response1.requestId should ===(2)
  response1.value should ===(Some(24.0))

  deviceActor ! Device.RecordTemperature(requestId = 3, 55.0, recordProbe.ref)
  recordProbe.expectMessage(Device.TemperatureRecorded(requestId = 3))

  deviceActor ! Device.ReadTemperature(requestId = 4, readProbe.ref)
  val response2 = readProbe.receiveMessage()
  response2.requestId should ===(4)
  response2.value should ===(Some(55.0))
}
Part 4: Working with Device Groups
Introduction
완성된 IOT시스템은 아래와 같아 보일 것이다.
- A sensor device in the home connects through some protocol.
- The component managing network connections accepts the connection.
- The sensor provides its group and device ID to register with the device manager component of our system.
- The device manager component handles registration by looking up or creating the actor responsible for keeping sensor state.
- The actor responds with an acknowledgement, exposing its ActorRef.
- The networking component now uses the ActorRef for communication between the sensor and device actor without going through the device manager.
스텝 1과 2는 우리 튜토리얼에서 다룰 내용을 벗어난다. 3~6을 다뤄보자. 우선, 얼마나 많은 actor level을 통해 device groups와 device sensors를 표현해야 할까?
아카는 설계가 중요하다. 액터간 상호작용에 대한 특성에 따라, 시스템을 조직하는 여러 유효한 방법이 있다. 우리의 경우엔 모든 그룹과 장치들을 관리하는 하나의 (hash map등을 사용하여)액터를 가질 수 있을 것이다.
아래의 가이드라인이 더 액터의 구조 잡는데 도움을 줄 것이다.
- In general, prefer larger granularity. Introducing more fine-grained actors than needed causes more problems than it solves.
- Add finer granularity when the system requires:
- Higher concurrency.
- Complex conversations between actors that have many states. We will see a very good example for this in the next chapter.
- Sufficient state that it makes sense to divide into smaller actors.
- Multiple unrelated responsibilities. Using separate actors allows individuals to fail and be restored with little impact on others.
높은 동시성, 더 잘게 쪼개진 액터, 서로 관련성이 없어서 하나가 죽어도 다른 것에 영향을 미치지 않아야 함. 등등.
Device manager hierarchy
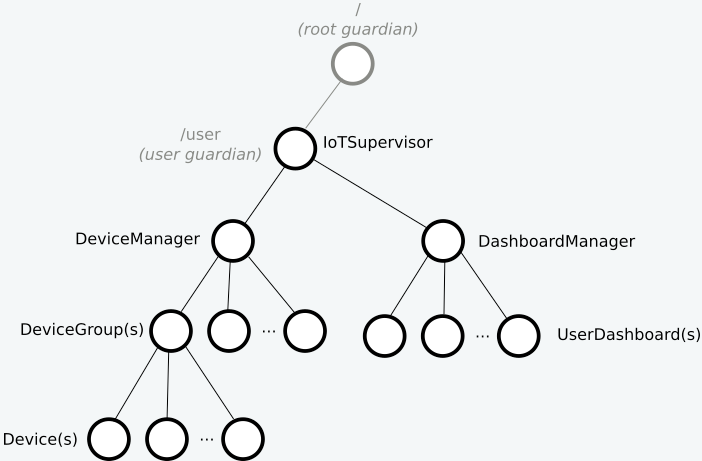
이전 섹션에서 설명한 원칙을 고려하여, device manager component를 다음과 같은 세 가지 level의 액터 트리로 모델링한다.
- The top level supervisor actor represents the system component for devices. It is also the entry point to look up and create device group and device actors. (맨위 액터는 관리자로서, 디바이스를 위한 시스템 컴포넌트를 나타낸다.)
- At the next level, group actors each supervise the device actors for one group id (e.g. one home). They also provide services, such as querying temperature readings from all of the available devices in their group. (디바이스 그룹은 하나의 집이라던지 하는 단위의 그룹을 나타낸다)
- Device actors manage all the interactions with the actual device sensors, such as storing temperature readings. (디바이스 액터는 실제 디바이스 센서와 통신한다)

요런 3 layer 구조를 선택한 이유는 다음과 같다.
-
Having groups of individual actors:
- Isolates failures that occur in a group. If a single actor managed all device groups, an error in one group that causes a restart would wipe out the state of groups that are otherwise non-faulty.
- Simplifies the problem of querying all the devices belonging to a group. Each group actor only contains state related to its group.
- Increases parallelism in the system. Since each group has a dedicated actor, they run concurrently and we can query multiple groups concurrently.
-
Having sensors modeled as individual device actors:
- Isolates failures of one device actor from the rest of the devices in the group.
- Increases the parallelism of collecting temperature readings. Network connections from different sensors communicate with their individual device actors directly, reducing contention points.
아키텍쳐가 정의되었다면, 센서를 등록하기 위한 프로토콜을 작성하기 시작 해 보자.
The Registration Protocol
처음으로, 디바이스를 등록하기 위해서와 그룹과 디바이스 액터를 만들기 위해서 프로토콜을 디자인 해야 한다. 이 프로토콜은 DeviceManager 컴포넌트를 통해 제공되는데, 이는 이 컴포넌트가 디바이스 그룹들과 디바이스 액터들을 on-demand하게 생성하는 유일한 컴포넌트이기 때문이다.
Looking at registration in more detail, we can outline the necessary functionality:
- When a DeviceManager receives a request with a group and device id:
- If the manager already has an actor for the device group, it forwards the request to it.
- Otherwise, it creates a new device group actor and then forwards the request.
- (그러니까, 이미 있는 액터에 대한 요청이면 내려보내고, 없는 액터에 대한 요청이면 새로 만든다는 뜻)
- The DeviceGroup actor receives the request to register an actor for the given device:
- If the group already has an actor for the device it replies with the ActorRef of the existing device actor.
- Otherwise, the DeviceGroup actor first creates a device actor and replies with the ActorRef of the newly created device actor.
- (그룹에 디바이스 액터가 있는 경우 이미 존재하는 디바이스 액터의 ActorRef를 답장하고, 그렇지 않으면 새로 만들어서 ActorRef를 답장한다는 소리)
- The sensor will now have the ActorRef of the device actor to send messages directly to it.
우리가 등록 요청과 확인을 받기 위해서 커뮤니케이션을 위해 사용하는 메시지의 정의는 아래와 같다.
final case class RequestTrackDevice(groupId: String, deviceId: String, replyTo: ActorRef[DeviceRegistered])
    extends DeviceManager.Command
    with DeviceGroup.Command

final case class DeviceRegistered(device: ActorRef[Device.Command])
질문 : ActorRef[Device.Command]라고 쓴 이유는 뭐지?
ActorRef[-T] 라서 그런가.ㅎ.? https://doc.akka.io/api/akka/current/akka/actor/typed/ActorRef.html
Adding registration support to device group actors
그룹 액터는 등록할 때 몇몇 할 일이 있다.
- Handling the registration request for existing device actor or by creating a new actor.
- Tracking which device actors exist in the group and removing them from the group when they are stopped.
Handling the registration request
디바이스 그룹 액터는 이미 존재하는 자식의 ActorRef를 통해 request에 답장을 하거나 새로운 자식을 만들어야 한다. child actor들을 look up 하기 위해서 우리는 Map을 사용 할 것이다.
object DeviceGroup {
  def apply(groupId: String): Behavior[Command] =
    Behaviors.setup(context => new DeviceGroup(context, groupId))

  trait Command

  private final case class DeviceTerminated(device: ActorRef[Device.Command], groupId: String, deviceId: String)
      extends Command

}

class DeviceGroup(context: ActorContext[DeviceGroup.Command], groupId: String)
    extends AbstractBehavior[DeviceGroup.Command](context) {
  import DeviceGroup._
  import DeviceManager.{ DeviceRegistered, ReplyDeviceList, RequestDeviceList, RequestTrackDevice }

  private var deviceIdToActor = Map.empty[String, ActorRef[Device.Command]]

  context.log.info("DeviceGroup {} started", groupId)

  override def onMessage(msg: Command): Behavior[Command] =
    msg match {
      case trackMsg @ RequestTrackDevice(`groupId`, deviceId, replyTo) =>
        deviceIdToActor.get(deviceId) match {
          case Some(deviceActor) =>
            replyTo ! DeviceRegistered(deviceActor)
          case None =>
            context.log.info("Creating device actor for {}", trackMsg.deviceId)
            val deviceActor = context.spawn(Device(groupId, deviceId), s"device-$deviceId")
            deviceIdToActor += deviceId -> deviceActor
            replyTo ! DeviceRegistered(deviceActor)
        }
        this

      case RequestTrackDevice(gId, _, _) =>
        context.log.warn2("Ignoring TrackDevice request for {}. This actor is responsible for {}.", gId, groupId)
        this
    }

  override def onSignal: PartialFunction[Signal, Behavior[Command]] = {
    case PostStop =>
      context.log.info("DeviceGroup {} stopped", groupId)
      this
  }
}*질문 : case trackMsg @ RequestTrackDevice는 뭐야
테스트 코드를 적자.
"be able to register a device actor" in {
  val probe = createTestProbe[DeviceRegistered]()
  val groupActor = spawn(DeviceGroup("group"))

  groupActor ! RequestTrackDevice("group", "device1", probe.ref)
  val registered1 = probe.receiveMessage()
  val deviceActor1 = registered1.device

  // another deviceId
  groupActor ! RequestTrackDevice("group", "device2", probe.ref)
  val registered2 = probe.receiveMessage()
  val deviceActor2 = registered2.device
  deviceActor1 should !==(deviceActor2)

  // Check that the device actors are working
  val recordProbe = createTestProbe[TemperatureRecorded]()
  deviceActor1 ! RecordTemperature(requestId = 0, 1.0, recordProbe.ref)
  recordProbe.expectMessage(TemperatureRecorded(requestId = 0))
  deviceActor2 ! Device.RecordTemperature(requestId = 1, 2.0, recordProbe.ref)
  recordProbe.expectMessage(Device.TemperatureRecorded(requestId = 1))
}

"ignore requests for wrong groupId" in {
  val probe = createTestProbe[DeviceRegistered]()
  val groupActor = spawn(DeviceGroup("group"))

  groupActor ! RequestTrackDevice("wrongGroup", "device1", probe.ref)
  probe.expectNoMessage(500.milliseconds)
}
이미 엑터가 있으면 이미 있는 엑터를 리턴할 것이고 이전에 리턴한 액터와 같아야 할 것 이다.
"return same actor for same deviceId" in {
  val probe = createTestProbe[DeviceRegistered]()
  val groupActor = spawn(DeviceGroup("group"))

  groupActor ! RequestTrackDevice("group", "device1", probe.ref)
  val registered1 = probe.receiveMessage()

  // registering same again should be idempotent
  groupActor ! RequestTrackDevice("group", "device1", probe.ref)
  val registered2 = probe.receiveMessage()

  registered1.device should ===(registered2.device)
}
Keeping track of the device actors in the group
Map[String, ActorRef[DeviceMessage]] 에서 디바이스가 사라지는 것도 구현 할 것이다. actor가 stopped될 때 사라진 것으로 가정 할 것이다. 관리는 오직 에러가 나서 종료된 경우만 처리하도록 할 것이다. 그러므로 우리는 액터가 언제 멈추는지 부모에게 전달 필요.
아카는 또 다른 아카가 멈췄는지 보고 있다가 알림을 받는 Death Watch 피쳐를 제공한다. Supervision과 다르게, 보는(watching) 기능은 parent-child 관계에 국한되지 않는다. ActorRef만 알고있으면 어떤 액터라도 볼 수 있다. 보던 액터가 멈추면 보던 액터의 reference가 담긴 Terminated(actorRef)시그널을 받게 된다.
(Part 4까지 보다가 일단 글을 그만 쓰게 되었는데요, Part 5까지 있는 글이니 나머지 부분은 불편하신대로 원문이랑만 보시면 어떨까 싶습니다 ㅜ)
아! 카테고리 이론 공부 마렵다!


